Desktop Broker
Connect your Desktop Broker account with Sharesight to sync your ongoing trades into your Sharesight portfolio. All Sharesight Professional users can connect their Desktop Brokers account to their Sharesight portfolio.
Note: We only allow for the import of standard buy and sell trades via the integration. Short selling transactions, including short and cover trade types, are not supported.
You can opt to import all historical trades during initial setup. Ongoing trades will be imported daily.
How to connect your Desktop Brokers account to Sharesight
1 - Copy and paste the paragraph below to a new email. Include your Desktop Broker account number and request the required details (username and password) for the Sharesight integration.
"Please see my request to provide information to Sharesight about certain Clients, as nominated by me from time to time. Under the terms of the Information, Trading & Settlement Services Agreement between us, a Licensee must ensure that it obtains the relevant consent from each Client in connection with its use of their Client Data. I confirm that the nominated Clients are aware, and have consented to, their Client Data being provided to Sharesight. Please proceed."
Send the email to: support@desktopbroker.com.au
Note:
- Requests should be sent from a registered business email, along with company licensee copied into the email.
- Please include a full list of accounts requested for access,
- Desktop Broker will provide you with username and password to be entered in Sharesight once access have been granted
2 - Once received, log into Sharesight.
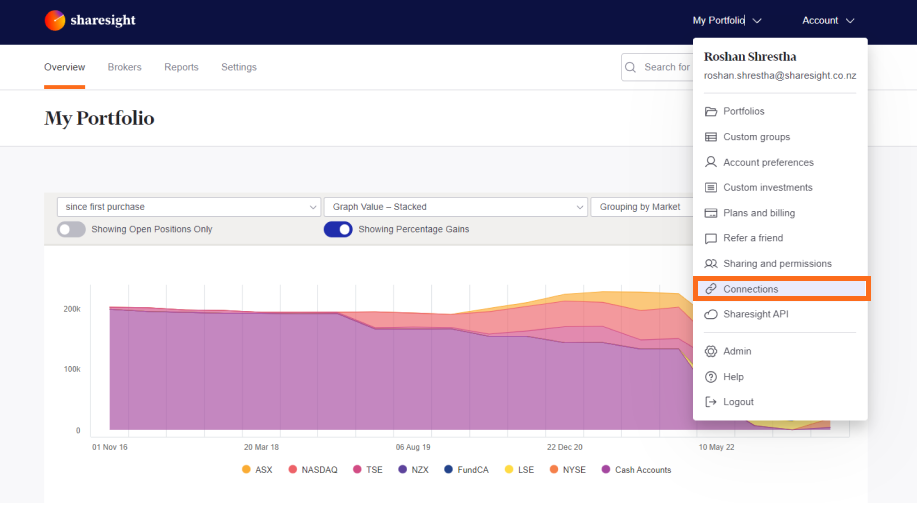
3 - Click on the ‘Account’ menu from any page in Sharesight.
4 - Click onto the ‘Connections’ option.

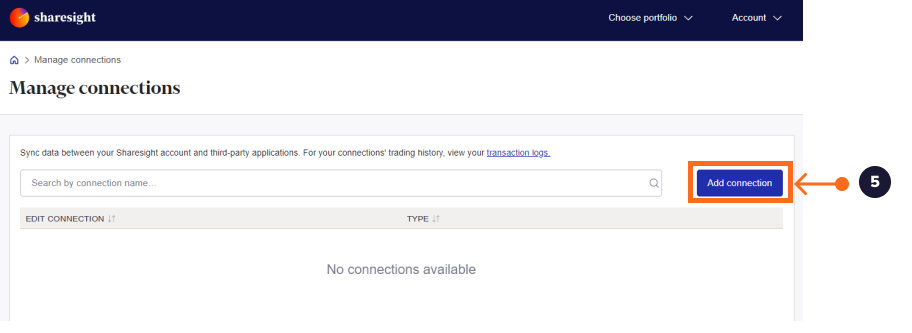
5 - Click the ‘Add New Connection’ button to add your Desktop Brokers account.

6- Choose ‘Desktop Broker’ in the connection type list and enter the following details:
-
Desktop Broker account name
-
Username and password provided to you by Desktop Broker
7 - Click "Create"

8 - Your Desktop Broker connection will now show on the manage connections page.

9 - Return to the overview page of the portfolio you wish to link Desktop Broker and click the ‘Settings’ tab.
10 - Select ‘Integrations’ under Connection and choose the Desktop Broker connection under Available Integrations

11 - Select the connection you just setup and enter the client id provided by Desktop Broker.
12 - Select the email notifications settings, this will be defaulted to ‘Off’ for each portfolio.
- Email notifications off - you will not be notified by email when trades are imported
- Email notifications on - you will be notified by email when trades are imported
- Email notifications errors only - you will only be notified by email when trades are not imported due to errors
13 - Choose whether or not to import historical trades. This can only be selected once at this step, if you elect to import historical trades for the portfolio, all trades will be imported since inception. If you elect not to import historical trades, you will not be able to do so again.
14 - Click ‘Create integration’.

15 - The Desktop Broker connection will now show under Configured Integrations. This integration can be updated at any time.
Please note the only details that can be updated after the integration is connected are the client id and email notification settings. You can also delete the integration.

Historical Trades
If you elected to import historical trades for a portfolio, on creating the integration, all historical trades will be imported into the portfolio and you will receive an email notification if you have set those to ‘on’ or ‘errors only' if any trades failed to be imported. Please note, this process may take some time.
You can view the transactions log from the Integrations menu to see the trades that have imported or errored.

Ongoing Trades
Daily buy and sell trades will be imported at 8am NZST each day and you will receive an email notification if you have set those to ‘on’ or ‘errors only' if any trades failed to be imported. The imported data will display in the transactions log.